

by Gareth McIlhatton, Senior Engineer
In today’s interconnected digital world, organisations must balance global collaboration with regional data sovereignty requirements. Microsoft Multi-Geo provides a robust solution, allowing businesses to distribute data storage across multiple geographic locations while maintaining a unified Microsoft 365 tenant.
This blog serves as your guide to navigating these complexities, offering practical solutions for managing data residency while ensuring seamless collaboration. While the shift to cloud-based solutions is undeniable, real-world constraints often demand a nuanced approach. Organisations operating in multiple countries must consider compliance, performance and governance when implementing Multi-Geo strategies.
In this blog we explore how you can tackle these challenges, leveraging Multi-Geo capabilities to strike the right balance between flexibility and regulatory adherence.
Introduction
As organisations expand globally, data residency requirements become increasingly complex. Microsoft Multi-Geo capabilities in Microsoft 365 offer a solution to this challenge, allowing businesses to store data in multiple geographic locations while maintaining a single tenant. This feature is particularly valuable for multinational companies dealing with regional data regulations, compliance needs, and user experience optimisation.
What is Microsoft Multi-Geo?
Microsoft Multi-Geo is a feature within Microsoft 365 that enables organisations to extend their primary tenant into additional geographic locations. This means businesses can host user data, such as OneDrive, Exchange and SharePoint, in different Microsoft data centres worldwide, based on where employees or regulatory requirements dictate.
Key Features
- Data Residency Control – Organisations can determine where their users’ Microsoft 365 data is stored, ensuring compliance with regional data laws.
- Single Global Tenant – Instead of managing multiple tenants, Multi-Geo allows organisations to operate under one unified environment while storing data in different locations.
- Improved Performance – Employees experience faster access to their data when it’s hosted in a region closer to them.
- Compliance and Governance – Helps meet country-specific regulatory requirements for data sovereignty.
- Flexible Data Placement – Allows IT admins to move user Exchange Online mailboxes and OneDrive storage to different geographies as needed.
Microsoft 365 Workloads Supported
Microsoft Multi-Geo currently supports the following workloads:
- Exchange Online – Mailboxes can be assigned to specific geographic locations.
- OneDrive for Business – User OneDrive storage can be placed in a preferred data region.
- SharePoint Online – Site collections can be assigned to different regions for compliance and performance benefits.
- Microsoft Teams – While Teams operates globally, file storage and data location are tied to SharePoint and OneDrive Multi-Geo settings.
How Multi-Geo Works
- Primary and Satellite Locations – Your organisation’s primary location is the main tenant, while satellite locations are additional regions where data can be stored.
- GeoLocation Tags – Users are assigned a preferred data location (PDL) based on their region.
- Seamless User Experience – Users can access and collaborate on files across different geographies with minimal disruption.
- Admin Controls in Microsoft 365 – IT admins can manage data residency through the Microsoft 365 admin centre and PowerShell commands.
Licensing and Requirements
Microsoft 365 Multi-Geo is available as an add-on to the following Microsoft 365 subscription plans:
- Microsoft 365 F1, F3, E3, or E5
- Office 365 F3, E1, E3, or E5
- Standalone Exchange Online Plan 1 or Plan 2
- Standalone OneDrive Plan 1 or Plan 2
- Standalone SharePoint Plan 1 or Plan 2
Note the below considerations before planning a Multi-Geo deployment. You can contact your Microsoft account team for further details.
- Enterprise Agreement customers must purchase a quantity of Multi-Geo licenses equal to or greater than 5% of their total eligible users.
- For Enterprise customers, the user subscription licenses must be on the same Enterprise Agreement as the Multi-Geo services licenses.
- CSP partners must purchase and assign a quantity of Multi-Geo licenses equal to or greater than 5% of their customers’ total eligible Microsoft 365 users.
Microsoft 365 Multi-Geo availability
Microsoft 365 Multi-Geo is currently offered in these regions:
| South Korea, Japan, Singapore, Malaysia, Hong Kong | APC |
| Australia | AUS |
| Brazil | BRA |
| Canada | CAN |
| France, Netherlands, Ireland, Norway, Switzerland, Austria, Finland, Sweden, Germany | EUR |
| France | FRA |
| Germany | DEU |
| India. | IND |
| Israel | ISR |
| Italy | ITA |
| Japan | JPN |
| Korea | KOR |
| Mexico | MEX |
| New Zealand | NZL |
| Norway | NOR |
| Poland | POL |
| Qatar | QAT |
| South Africa | ZAF |
| Spain | ESP |
| Sweden | SWE |
| Switzerland | CHE |
| Taiwan | TWN |
| United Arab Emirates | ARE |
| United Kingdom | GBR |
| United States | NAM |
Common Use Cases
- Regulatory Compliance – A European-based company with subsidiaries in Canada and Australia can ensure that user data remains within the respective countries to comply with local data protection laws.
- Mergers and Acquisitions – A newly acquired company in Asia can be integrated into the global Microsoft 365 tenant while keeping its data in a local datacentre.
- Performance Optimisation – Employees working in different continents can experience improved access speeds by hosting data in a region closer to them rather than relying on a single datacentre in a distant location.
Considerations Before Enabling Multi-Geo
- Cost – Multi-Geo licensing comes with an additional premium.
- Data Migration – Existing data may need to be moved, which can be complex and time-consuming.
- Limited Workload Support – Not all Microsoft 365 services support Multi-Geo (at the time of writing).
- Compliance Complexity – While Multi-Geo helps with residency, organisations must still ensure they meet any data processing and transfer laws.
Enable Multi-Geo in Your Organisation
Once you have purchased the Multi-Geo Capabilities in Microsoft 365 licenses and they are visible under your tenant licence blade, you can proceed with enabling Multi-Geo in your environment.
Step 1: Add Satellite Geography Locations for SharePoint and OneDrive
To store data in specific geographical locations, follow these steps to add each Satellite Geography location:
- Open the SharePoint Admin Center and navigate to Geo Locations.
- Select Add Location.
- Choose the geographical location where you want to store data and click Next.
- Enter the domain you want to associate with the new geo location (e.g.,
mycompanyaus.sharepoint.com). Ensure this domain differs from your primary SharePoint address (mycompany.sharepoint.com). - Click Add, then Close.
The provisioning process may take anywhere from a few hours to up to 72 hours, depending on the size of your tenant. Once the Satellite Geography location is fully provisioned, you will receive an email confirmation.
Step 2: Verify and Assign Users to the New Geography Location
After provisioning is complete – The new Geography location will appear in blue on the Geo Locations tab in the OneDrive and SharePoint Admin Centre.
You can now proceed to set users’ preferred data location (PDL) to the new Satellite Geography by following the below steps:
Entra ID (Cloud Users)
To set the PDL for a cloud user or a shared/resource mailbox in Exchange Online you need to set the attribute using PowerShell and MSGraph, use the below commands:
- Connect to MS-Graph:
Connect-Graph -Scopes User.ReadWrite.All
- Set PDL attribute:
$userUPN="<user's UPN>"
$user = Get-MgUser -UserId $userUPN
Update-MgUser -UserId $user.Id -PreferredDataLocation <international location code e.g EUR/AUS>
Active Directory (AD) (Synced Users)
If your company’s users are synchronised from an on-premises AD to Microsoft Entra ID (Entra), their PreferredDataLocation must be populated in AD and synchronised to Entra.
Microsoft Entra Connect supports synchronisation of the preferredDataLocation attribute for User objects in version 1.1.524.0 and later. Specifically:
- The schema of the object type User in the Microsoft Entra Connector is extended to include the preferredDataLocation attribute. The attribute is of the type, single-valued string.
- The schema of the object type Person in the metaverse is extended to include the preferredDataLocation attribute. The attribute is of the type, single-valued string.
By default, preferredDataLocation isn’t enabled for synchronisation. This feature is intended for larger organizations. The Active Directory schema in Windows Server 2019 has an attribute msDS-preferredDataLocation you should use for this purpose.
The following sections provide the steps to enable synchronisation of the preferredDataLocation attribute.
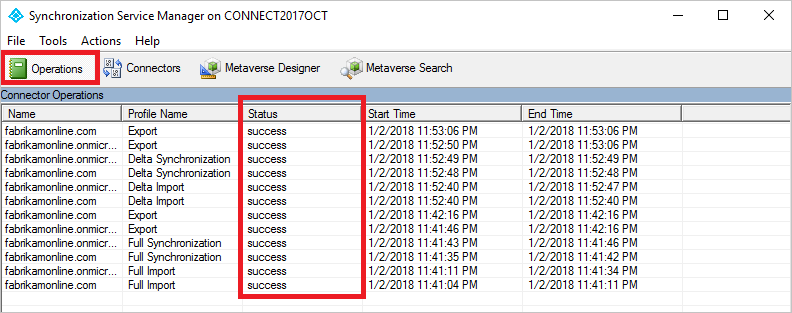
Step 1: Disable sync scheduler and verify there is no synchronisation in progress
To avoid unintended changes being exported to Microsoft Entra ID, ensure that no synchronisation takes place while you are in the middle of updating the rules. To disable the built-in sync scheduler:
- Start a PowerShell session on the Microsoft Entra Connect server.
- Disable scheduled synchronisation by running this cmdlet:
Set-ADSyncScheduler -SyncCycleEnabled $false. - Start the Synchronization Service Manager by going to Start > Synchronization Service.
- Select the Operations tab, and confirm there’s no operation with the status in progress.
Step 2: Refresh the schema for Active Directory
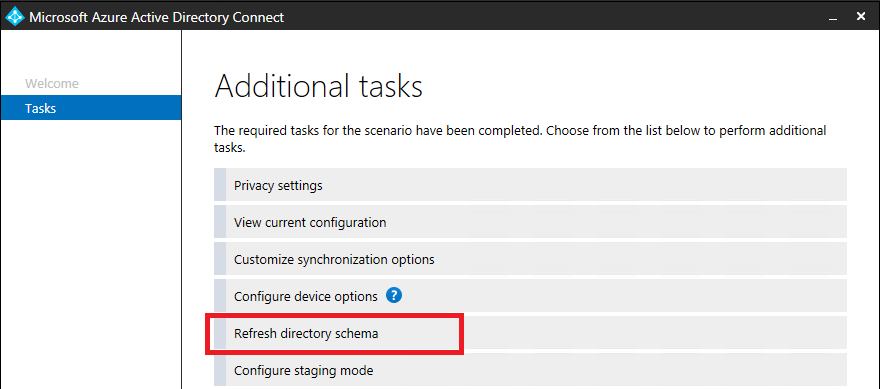
If you updated the Active Directory schema to 2019 and Entra ID Connect was installed before the schema extension, then the schema cache doesn’t have the updated schema. You must then refresh the schema from the wizard for it to appear in the UI.
- Start the Microsoft Entra Connect wizard from the desktop.
- Select the option Refresh directory schema and select Next.
- Enter your Microsoft Entra credentials and select Next.
- On the Refresh Directory Schema page, make sure all forests are selected, and select Next.
- When completed, close the wizard.
Step 3: Create an inbound synchronisation rule
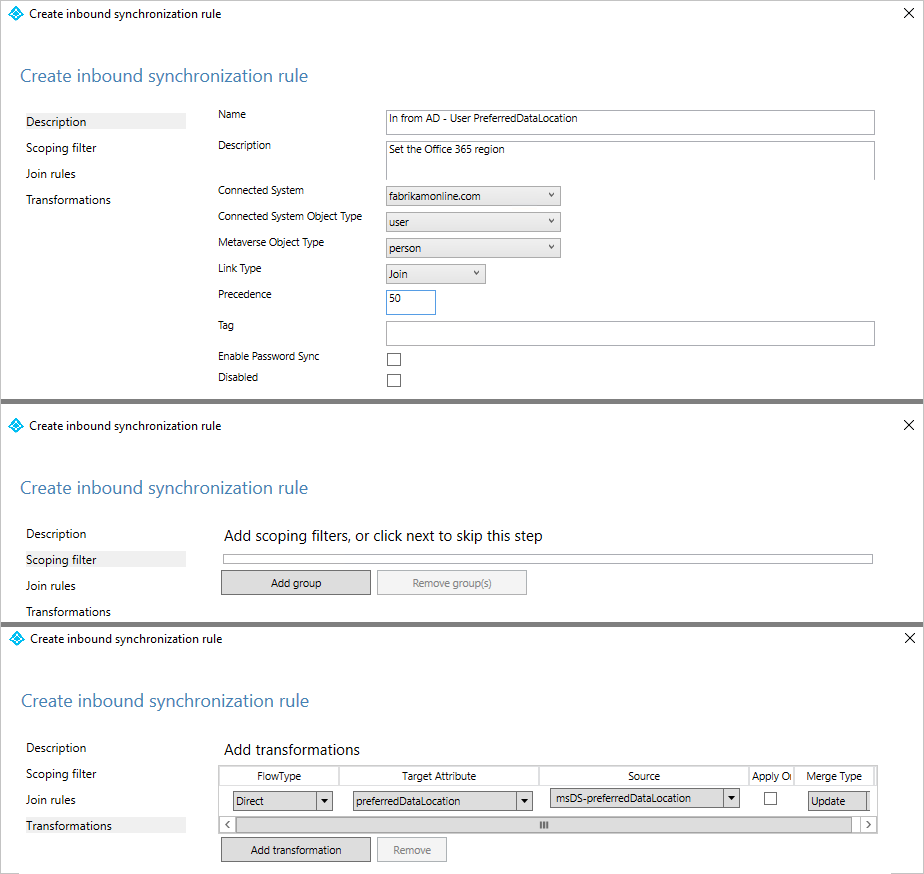
The inbound synchronisation rule permits the attribute value to flow from the source attribute in on-premises Active Directory to the metaverse.
- Start the Synchronization Rules Editor by going to Start > Synchronization Rules Editor.
- Set the search filter Direction to be Inbound.
- To create a new inbound rule, select Add new rule..
- Under the Description tab, provide the following configuration:
| Attribute | Value | Details |
|---|---|---|
| Name | Provide a name | For example, “In from AD – User preferredDataLocation” |
| Description | Provide a custom description | |
| Connected System | Pick the on-premises Active Directory Connector | |
| Connected System Object Type | User | |
| Metaverse Object Type | Person | |
| Link Type | Join | |
| Precedence | Choose a number between 1–99 | 1–99 is reserved for custom sync rules. Do not pick a value that is used by another synchronization rule. |
- Keep the Scoping filter empty, to include all objects. You might need to tweak the scoping filter according to your Microsoft Entra Connect deployment
- Go to the Transformation tab, and implement the following transformation rule:
| Flow type | Target attribute | Source | Apply once | Merge type |
|---|---|---|---|---|
| Direct | preferredDataLocation | Pick the source attribute | Unchecked | Update |
- To create the inbound rule, select Add.
Step 4: Create an outbound synchronisation rule
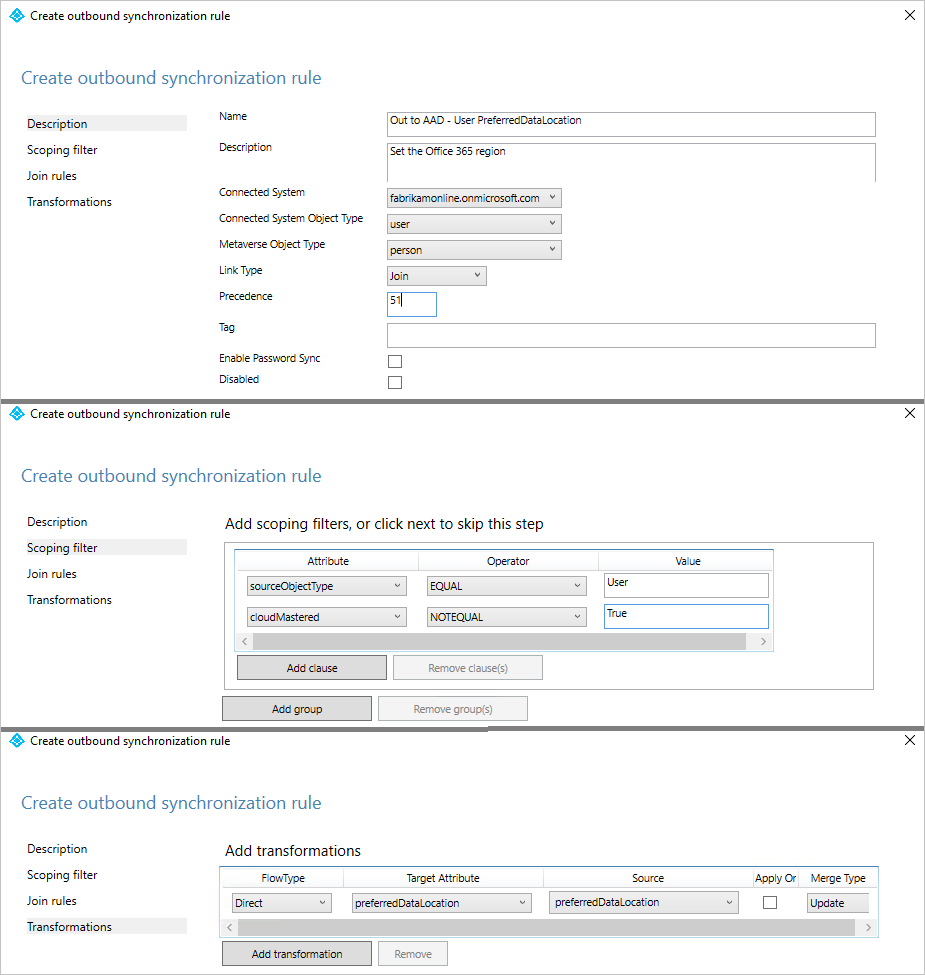
The outbound synchronisation rule permits the attribute value to flow from the metaverse to the preferredDataLocation attribute in Entra:
- Go to Synchronization Rules Editor.
- Set the search filter Direction to be Outbound.
- Select Add new rule.
- Under the Description tab, provide the following configuration:
| Attribute | Value | Details |
|---|---|---|
| Name | Provide a name | For example, “Out to Microsoft Entra ID – User preferredDataLocation” |
| Description | Provide a description | |
| Connected System | Select the Microsoft Entra Connector | |
| Connected System Object Type | User | |
| Metaverse Object Type | Person | |
| Link Type | Join | |
| Precedence | Choose a number between 1–99 | 1–99 is reserved for custom sync rules. Do not pick a value that is used by another synchronization rule. |
- Go to the Scoping filter tab, and add a single scoping filter group with two clauses:
| Attribute | Operator | Value |
|---|---|---|
| sourceObjectType | EQUAL | User |
| cloudMastered | NOTEQUAL | True |
- Go to the Transformation tab, and implement the following transformation rule:
| Flow type | Target attribute | Source | Apply once | Merge type |
|---|---|---|---|---|
| Direct | preferredDataLocation | preferredDataLocation | Unchecked | Update |
- Click Add to create the outbound rule.
Step 5: Run full synchronisation cycle
- Run Full import on the on-premises AD Connector:
- Go to the Connectors tab in the Synchronization Service Manager.
- Right-select the on-premises Active Directory Connector, and select Run.
- In the dialog box, select Full Import, and select OK.
- Wait for the operation to complete.
- Run Full import on the Microsoft Entra Connector:
- Right-select the Microsoft Entra Connector, and select Run.
- In the dialog box, select Full Import, and select OK.
- Wait for the operation to complete.
- Run Full Synchronisation on the on-premises Active Directory Connector:
- Right-select the on-premises Active Directory Connector, and select Run.
- In the dialog box, select Full Synchronisation, and select OK.
- Wait for the operation to complete.
Step 6: Re-enable sync scheduler
- Start a PowerShell session.
- Re-enable scheduled synchronisation by running this cmdlet:
Set-ADSyncScheduler -SyncCycleEnabled $true
You can manually set the msDS-preferredDataLocation attribute from AD as shown in the image below, or it can be set via PowerShell:
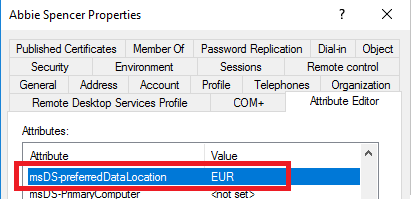
Set-ADUser -Identity "UserSamAccountName" -Replace @{msDS-PreferredDataLocation="<international location code e.g EUR>"}Conclusion
Microsoft Multi-Geo is a powerful tool for enterprises looking to balance global collaboration with local data residency requirements. Whether driven by regulatory needs or performance optimisation, Multi-Geo provides a flexible solution for modern businesses operating across multiple regions.
Have you implemented Microsoft Multi-Geo in your organisation? Share your experiences and insights in the comments below!

0 Comments